Developing a Knowledge Module in Oracle Data Integrator
Learn how to build your very own Integration Knowledge Module for fast time-to-production in data integration design.By Uli Bethke
Published June 2009
Knowledge modules (KMs) in Oracle Data Integrator are components that implement reusable transformation and ELT (extract, load, and transform) strategies across different technologies. One example of this is extracting data through change data capture from Oracle Database 10g and loading the transformed data into a partitioned fact table in Oracle Database 11g, or creating timestamp-based extracts from a Microsoft SQL Server database and loading this data into a Teradata enterprise data warehouse.
The power of KMs lies in their reusability and flexibility—for example, you can develop and implement a loading strategy for a fact table and then, with a click of a mouse, apply this loading strategy to all of your fact tables. If you adapt your ELT strategy to changing business requirements and modify the associated KM, all interfaces that use the KM inherit the changes. You can mix and match different programming languages, types, and styles (native RDBMS SQL, scripting languages such as Jython or JavaScript, or even Java). This is what makes these KMs extremely flexible. This innovative approach is called Oracle Data Integrator Declarative Design and can be up to 10 times faster than traditional ETL approaches.
Oracle Data Integrator ships with various predefined KMs. You can directly use these in your ELT interfaces (the equivalent of an Oracle Warehouse Builder mapping) or adapt them to your specific requirements. Oracle Data Integrator implements five different types of KMs. Each of them covers one phase in the transformation process from source to target. The three most important types of modules are the integration knowledge module (IKM), the loading knowledge module (LKM), and the check knowledge module CKM.
In this article, we will create a new IKM. Our requirement for the IKM is to load the partitioned Sales fact table in the Sales History (SH) sample schema. In order to improve load performance of a fact table, we make the foreign key constraints and the bitmap indexes unusable for the duration of the load. Postload, these will be re-enabled. As part of the IKM, we will also include an optional step that will allow us to enable extended trace for the duration of the interface execution.
Prerequisites and Resources
This article is based on Oracle Database 11g (11.1.0.7.0) and Oracle Data Integrator 10.1.3.4.0.I assume that you have already set up an Oracle Data Integrator master and work repository. See "Oracle Data Integrator: Getting Started with an ETL Project" (PDF) for details.
Here are some more helpful resources:
- "Oracle Data Integrator Best Practices for a Data Warehouse" (PDF)
- "Oracle by Example Series for Oracle Data Integrator"
- "Oracle Data Integrator Substitution Methods Reference" (PDF)
- Finally, you can download biweekly Webcasts delivered by Oracle Data Integrator product management.
- The completed IKM can be downloaded
here. To import the IKM, save it to your file system and import it with the Oracle Data Integrator Designer module.
Create Source Schema
First of all, we will create a new schema and a new table. This will be our datasource. We will also insert two records into this table. In a real-world scenario, you would more than likely have a lot more data, but for demonstration purposes these two records will suffice. Log in as user sys via SQL+ and execute the following statements:
SQL> CREATE USER sales_source IDENTIFIED BY sales_source;


User created.


SQL> GRANT CONNECT TO sales_source;


Grant succeeded.


SQL> GRANT RESOURCE TO sales_source;


Grant succeeded.


SQL> CREATE TABLE sales_source (
  2     PROD_ID NUMBER NOT NULL ,
  3     CUST_ID NUMBER NOT NULL ,
  4     TIME_ID DATE NOT NULL ,
  5     CHANNEL_ID NUMBER NOT NULL ,
  6     PROMO_ID NUMBER NOT NULL ,
  7     QUANTITY_SOLD NUMBER NOT NULL ,
  8     AMOUNT_SOLD NUMBER NOT NULL
  9  ) ;


Table created.


SQL> INSERT INTO sales_source VALUES (13,987,TO_DATE('01/01/1999','DD/MM/YYYY'),3,999,1,500);


1 row created.


SQL> INSERT INTO sales_source VALUES (13,987,TO_DATE('01/04/1999','DD/MM/YYYY'),3,999,1,500);


1 row created.


SQL> COMMIT;


Commit complete.
Next we grant our target schema user SH execute privileges on the dbms_monitor package. The dbms_monitor package will allow us to launch extended trace. (See this Oracle Magazine article for more information on dbms_monitor.)SQL> grant execute on dbms_monitor to sh; Grant succeeded.
Finally, we create a user for the Oracle Data Integrator work schema. For some of the data validation and transformation operations, Oracle Data Integrator needs to create (temporary) work objects. It is best practice to have these objects in a separate schema to avoid confusion between data warehouse objects and the temporary work objects.SQL> CREATE USER odi IDENTIFIED BY odi; User created. SQL> GRANT CONNECT,RESOURCE TO odi; Grant succeeded.Create Development Context
Contexts are used to group physical resources together in the same environment. Typical contexts are Development, User Acceptance Test (UAT), Production, and so on.
We create contexts with the Topology Manager. For the purpose of this article, we will just create a Development context. In Topology Manager, click the Context tab and then click the Insert Context icon. This will bring up the Definition tab for the context. Populate the fields as shown in the figure below.
We will now create the physical and logical architecture for our source schema (SALES_SOURCE). First we create the physical architecture for the source schema. In Topology Manager, select the Physical Architecture tab and expand Technologies. Right-click Oracle and select Insert Data Server.
For the name of the data server, we follow the naming guidelines in the Oracle Data Integrator Best Practices for a Data Warehouse guide: <TECH_NAME>_<SRV_NAME> (in uppercase). So we will name the data server ORCL_SALES_SOURCE_DEV. We populate the other fields on the Definition tab as shown in the figure below. Change to the JDBC tab and populate as shown in the figure below. You need to replace <host> with the server network name or IP address, <port> with the listener port number (usually 1521), and <sid> with the instance service name (Oracle SID).
 /
/
Click the Test button to make sure that the data entered is correct and then click OK. On the following screen, select the SALES_SOURCE schema from the Schema (Schema) drop-down menu. Select ODI as the Schema (Work Schema). Remember that this is the schema in which Oracle Data Integrator creates temporary work objects. Leave the default values for the other fields (as shown in the figure below). Click OK.
Ignore the following warning message: In the previous steps, we created the physical schema. We will now create the logical schema for the ORCL_SALES_SOURCE_DEV data server. In Topology Manager, click the Logical Schema tab. Expand Technologies, right-click Oracle, and select Insert Logical Schema. Again we will follow the naming convention from the best-practice guide: <TECH_NAME>_<SCHEMA_NAME> (in uppercase). So we will name the logical schema ORCL_SALES_SOURCE.
For the Development context, select ORCL_SALES_SOURCE_DEV.SALES_SOURCE from the Physical Schema drop-down menu. Click OK.

Create Physical and Logical Architecture for SH Schema
Repeat the steps from the previous section to set up the physical and logical schema for the SH schema. Adapt names, usernames, passwords, and so on to reflect the properties of the SH schema.
Reverse-Engineer the SALES_SOURCE and SH Models into Oracle Data Integrator Designer Module
We use the Oracle Data Integrator Designer Module to reverse-engineer the metadata of source and target schemas. Log into Designer, click the Models tab, and click the Insert Model Folder icon (as shown in the figure below).
Name the new model EDW and click OK. Next, right-click the new EDW folder and select Insert Model.
On the Definition tab, type in SALES_SOURCE for the Name. Select Oracle from the Technology drop-down menu and ORCL_SALES_SOURCE from the Logical Schema drop-down menu.
Change to the Reverse tab and select Development from the Context drop-down menu. Leave the default values for the other fields. Next click the Reverse button to reverse-engineer the SALES_SOURCE model. The reverse-engineering process may take a minute or two to complete. The next step will be to reverse-engineer the SH schema. Create the SH model in the EDW model folder by following the steps we have discussed for creating the SALES_SOURCE model.
Create IKM to Load Fact Table
In this section, we will create a new IKM that implements best practice methods for loading a fact table in a data warehouse. We will set up optional tracing and disable foreign keys and indexes preload. Once we have loaded the fact table, we will re-enable foreign keys and indexes and also disable tracing.
To start off with, we highlight the Projects tab and create a new project by clicking the Insert Project icon.
We name this project EDW. Next we will create a new IKM.
Expand the EDW project and KMs folders, right-click the Integration folder, and select Insert Integration (IKM).
We name our new IKM "IKM Oracle Append (Disable FKs & Indexes)." This is in line with the best practice for naming KMs: <Type of Module> <Technology(ies)> <Load Strategy> (<Details of implementation>). Also select Oracle from the Target Technology drop-down menu.
Via the Details tab, we define the individual steps of the KM. As you will see later, execution of each step can be made optional when run in an interface. The figure below displays the completed IKM.
We will now go through most of the above steps. All of the above steps are written with a mixture of SQL and the Oracle Data Integrator substitution API.
Start Trace
We use the dbms_monitor package to enable tracing for our interface. Note that we need to call the session_trace_enable procedure from within a PL/SQL block.
As you can see from the figure below, we want to make tracing wait events optional. For that purpose, we have defined an option named TRACE_WAITS. We can reference this option via the getOption substitution API method. Also, we have defined a default value of false for the Option. As such, tracing is disabled by default when the IKM is executed in an interface. We can later override this value when executing the IKM via an interface. From the Options tab, we can see that we do not always enable tracing (the Always Execute check box is not selected). Whether tracing is enabled is determined by the value of the Trace option.
 By default the Trace option is set to No. We can later override this in the interface.

Drop Staging Table
Dropping the staging table will get rid of records from a previous ETL run. We use the odiRef.getTable substitution API method to get the name of the staging table. The staging table is referenced as INT_NAME. Note that we have selected the Ignore Errors check box. In case we run the ETL for the first time, the staging table has not yet been created. If we try to drop a nonexistent table Oracle will return an error message. To prevent the ETL from stopping an execute if it comes across an error, we select the Ignore Errors check box for this step. This will save us from writing lengthy error handling procedures. (Note that instead of dropping the staging table, we could also have truncated it.)

Create Staging Table
Once we have dropped the staging table and deleted any old records, we can recreate it.
We set the PCTFREE attribute of the table to the value of the PCTFREE option. By default, the value is 0. Because we are only inserting records into this table and never update them, we can make use of all of the space on the data blocks of this table.

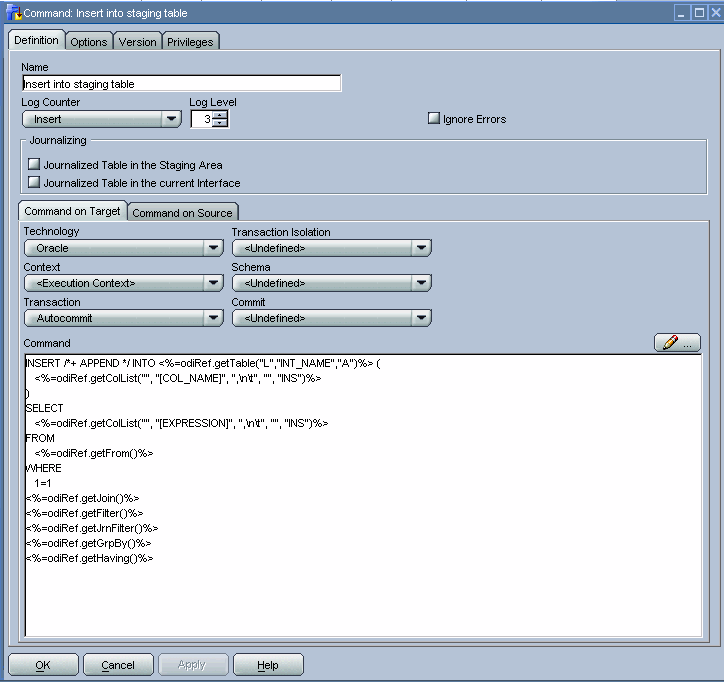
Insert into Staging Table
We use a mix of SQL and the Oracle Data Integrator substitution API to load the Sales staging table into our Oracle Data Integrator work schema from the SALES_SOURCE schema.
Disable FK Constraints
We disable the foreign keys of the Sales table before we load the data into it. For large volumes of data, this will speed up the load process. This could be very important in performance-critical environments such as near-real-time data warehouses.
Oracle Data Integrator includes a mechanism in KMs that allows us to use implicit cursors to perform an action for every row returned by a SQL SELECT statement. To do so, you simply need to specify the SELECT statement in the Source tab of the KM step and the action code in the Target tab. This is a brilliant feature, because it will save you from manually coding a cursor in PL/SQL and as a result will save you a lot of development time.
Under the Command on Source tab, we specify the following:
We query the user_constraints table in the Oracle Data Dictionary to return a list of all the foreign key constraints on the target table (the Sales table in the SH target schema). In the Command on Target tab we can reference the target table and constraint name by prefixing them with the # sign and disable the foreign key constraints.
Note that I ran an extended trace against the implicit cursor. For each constraint on the Sales target table, Oracle Data Integrator sent an ALTER TABLE... statement to the database server. Because there are five foreign keys on the Sales table, we end up with five ALTER TABLE... statements.
Make BIX Unusable
In this step, we disable the bitmap indexes of the Sales fact table. This will speed up the loading of our fact tables. We only disable the bitmap indexes on those table partitions into which we load data. In our example, these will be the partitions for Q1 and Q2 1999.
As in the previous step, we once more use an implicit Oracle Data Integrator cursor to implement this step. For the Command on Source tab we use a mix of SQL and Oracle Data Integrator substitution API methods to retrieve the distinct time_ids inserted into the staging table. Based on these time_ids, we can determine the partitions to which they relate in the target table. The odiRef.getTable("L","INT_NAME","W")substitution API method will retrieve the staging table for us.
In the Command on Target window, we specify the syntax to disable index partitions on the target table. In the next couple of steps, we insert records into the target table, re-enable foreign key constraints, make bitmap indexes reusable, and disable tracing. For more details on these individual steps, I have made an export of the KM. (Recall that at the beginning of this article, you saw a link for downloading the IKM, with instructions on how to import it into Oracle Data Integrator.) Note that, in a real-world data warehouse scenario, we would have added a few more steps to the IKM, such as gathering statistics on the target table, handling and recycling constraint violations, doing surrogate key lookups, and so on.
Create Interface
An interface is an Oracle Data Integrator object that enables the loading of one target datastore (Oracle Data Integrator�speak for a table) with data transformed from one or more source datastores. The related object in Oracle Warehouse Builder is a mapping. However, thanks to the concept of reusable KMs, it is a lot quicker to create an Oracle Data Integrator interface than it is to develop an Oracle Warehouse Builder mapping.
Before we start creating the interface, we need to import two more KMs: one for extracting the data from the source system (LKM), and a KM that will check for constraint violations. We will need both of them in our interface.
To import a KM log in to Designer, click the Projects tab, and expand Knowledge Modules. Right-click Loading (LKM) and select Import Knowledge Modules. Browse to the Import Export folder (<odi home>\oracledi\impexp) and select LKM SQL to Oracle. Click OK.
Next we import the CKM. Go through the same steps as above and this time select CKM Oracle. Click OK. Now we are finally ready to create the interface. Expand the EDW project and also the First Folder. Right-click Interfaces and select Insert Interface. According to the best practice guide, the naming convention for interfaces is Int.<TARGET_TABLE> <DETAILS>. We will name our interface Int.SALES FACT LOAD. Also set the Optimization Context to Development from the drop-down menu.
Change to the Diagram tab. From the Models tab, drag and drop the sales_source datastore from the Sales_Source model to the Sources area. Drag and drop the Sales table from the SH model to the Target Datastore area. You are then prompted to perform an automatic mapping. Confirm this with Yes. Next make sure that no errors were detected in your mapping by clicking the Errors button.
 Next click the Flow tab. In the screen that opens, click the SALES_SOURCE datastore and from the LKM Selection drop-down menu select the LKM SQL to Oracle.
 Next click the Target+Staging Area. Select our IKM Oracle Append (Disable FKs & Indexes) from the IKM Selection drop-down menu. In the Option area at the bottom of the screen, highlight the Trace Option and set it to Yes. This will override the default value for tracing, and as a result tracing will be enabled in the execution of our interface.
 Next click the Controls tab, and from the Select your KM drop-down menu select CKM Oracle.
 We are now ready to execute our interface and test our KM. Click the Execute button, and in the pop-up menu that appears select Development as the Context. Finally, click OK.
 To verify the execution status of our interface, we need to log in to the Oracle Data Integrator Operator module. In the Operator module, we can view execution statistics and errors from all angles and at all levels of detail. For example, from the execution stats below we can see that the step that took the longest to execute was Enable FK constraints. This took six seconds. We can also see that we inserted two records into the staging table and two records into the fact table.

Source:
http://www.oracle.com/technetwork/articles/bethke-odi-090881.html
No comments:
Post a Comment